


This help file describes using the Protege OWL tool.
Before starting Protege should be configure. See: Protege Configuration
The following steps identify how to open an existing RDL:
- Open Protege
- Select "Open OWL ontology"
- Select the RDL file from in the browser.
The location will be:
<PLCSlib>\data\contexts\<Cntx>\refdata\<cntx>-rdl-<lang>.owl
- The RDL should either:
- Load correctly
- Report that a require ontology could not be located.
In which case Protege offers you a chance to resolve the missing import, to which
you should respond "yes"
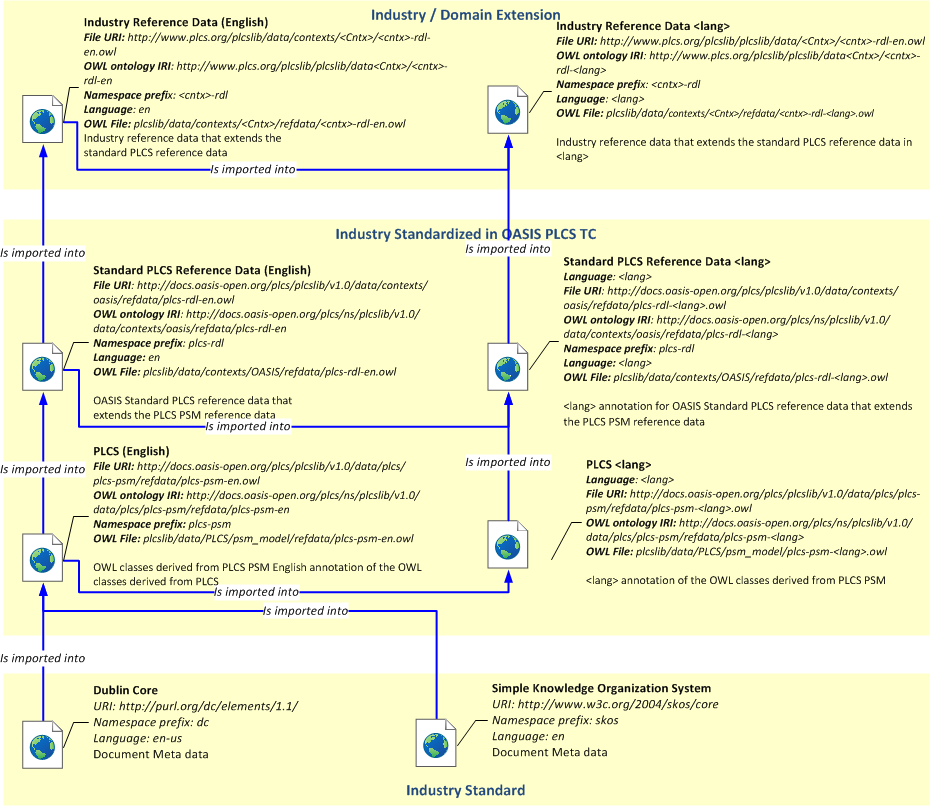
- For each mising import select the required owl file based on the file locations given in Figure 1
The following steps identify how to create a new RDL for a Context:
- Open Protege
- Select "Create new OWL ontology"
- Set the Ontology IRI as specified below:
http://www.plcs.org/<Cntx>/<cntx>-rdl
- Click "Continue"
- Set the Physical Location as specified below:
<PLCSlib>\data\contexts\<Cntx>\refdata\<cntx>-rdl-<lang>.owl
NOTE Protege will provide a default file location based on the last opened file. This will probably be wrong and special attention has to be paid to the file location and name (which should be all lowercase). - Click "Continue"
- Select "RDF/XML"
- Click "Finish"
NOTE The process may take a while to complete.
The OASIS PLCS standard RDL should be imported into this RDL as shown in the following steps:
- The default view should now include "Active Ontology" in the upper frame and "Ontology imports" in the lower frame;
- In the lower frame "Ontology imports" click the "+" symbol to the right of "Direct imports";
- Select "Import an ontology contained in a specific file."
- Click "Continue"
- Specify the file path as below:
<PLCSlib>\data\contexts\OASIS\refdata\OASIS-rdl-<lang>.owl
- Click "Continue"
- Click "Finish"
- At this point Protege may respond with "Resolved missing import?" since it does not
know about this or other imported RDLs.
- Click "Yes"
- Select the appropriate RDL file name according to the RDL naming scheme.
- Click "Open"
- Click "Close"
Use the following procedure to add a Class to the RDL:
- Select the "Classes" tab in Protege.
- Navigate to and select the appropriate class that you are going to create a sub class of in the "Class hierarchy"
- Click on the "Add subclass" button at the top of the window (indented "lollipop" symbol).
- This will open the "Create a new OWLclass" editor.
- Enter the name of the class to reflect the required class identifier.
- If you are using the Annotation template plug-in then populate the required annotation values in the Annotation Template window.
- If you are not using the plug-in then use the "Annotations" icon to add and populate
the following properties:
- skos:prefLabel
- rdfs:comment
- dc:creator
- dc:date
- dc:source
- owl:versionInfo
Use the following procedure to add an Individual to a Class in the RDL:
- Select the "Individuals" tab in Protege.
- Navigate to and select the appropriate class that you are going to create an individual of in the "Class Hierarchy" window.
- In the "Member list" window click the "Add individual" icon (a diamond with a + symbol).
- This will open a "Create a new OWLNamedIndividual" window.
- Enter the name of the individual to reflect the required individual identifier.
- If you are using the Annotation template plug-in then populate the required annotation values in the Annotation Template window.
- If you are not using the plug-in then use the "Annotations" icon to add and populate
the following properties:
- skos:prefLabel
- rdfs:comment
- dc:creator
- dc:date
- dc:source
- owl:versionInfo
Unlike previous versions of Protege the current version saves the owl file in the required format if all instructions in this guide have been followed. Therefore just use the "File->Save" menu option to save your changes.
When Protege is installed on a Windows Operating system it creates a "Program group" that reflects the version of Protege installed. Within this program group Protege installs a shortcut to the main executable. This strategy has one major problem (that has been reported by many people on the Protege discussion forums) in that the shortcut is to a executable that has Admin only execution privileges. In some situations this may be acceptable but in many "lock-down" systems this will result in Protege not being accessible. In this case it is strongly recommended to add another shortcut to the Protege program group that points to a batch command that will execute Protege in a general user mode. The following actions will create the appropriate shortcut without the need for admin privileges:
- Using Windows Explorer navigate to the Protege installation folder
- Right click on the file called run.bat
- Select "Create shortcut"
- If running without admin privileges you will be informed that the shortcut cannot be created here and will be placed on your desktop
- Click the start button
- Right click on "All programs"
- Select Open
- Double click the Programs folder
- Create a new folder in your Programs folder called exactly the same as the Programs
Group created by Protege
- Click the start button
- Click "All programs"
- Right click on the Protege Program Group
- Select "Properties"
- Copy the folder name
- Paste the folder name as the name of the newly created folder
- Drag the shortcut from your desktop into the new folder you have just created.
- Give the shortcut a reasonable name such as "Protege (users)"
- Close all windows created during this process
- Test the new shortcut from the Programs menu
This section identifies how to setup Protege for use in PLCSlib environment.
The first requirement is to use the Protege add-on Annotation_template_view, this
is available from
co-ode-owl-plugins
The plug-in should be added to the Protege "plugins" folder and Protege re-started if already running.
The default annotation_template settings file should be imported into Protege using the following routine:
- Open Protege
- File->Preferences
- Select Annotation template
- Click the file open icon (an open folder)
- Select the file:
<PLCSlib>/etc/Protege/annotation_template
- Click "Ok"
Enable the Annotation template view in the Class editor using the following procedure:
- Select the Classes tab
- Select menu
Window->Views->Misc views->Annotation template - Drop the view at an appropriate place in the right hand frame
Whenever a class is edited or created the Annotation template will be shown and the default properties should be shown and available for editing.
It is often useful to see the URI of an OWL class in an ontology and copy and paste
it into a document.
This can be done in Protege by adding the "URITools" plug-in. This is available from
URITools.
Download the zip file, unpack and place the JAR file in the Protege plugins folder,
i.e.
<protegehome>/plugins. Then
enable the URI view in the Class editor using the following procedure:
- Select the Classes tab
- Select menu
Window -> Views -> Misc views -> Entity URI - Drop the view at an appropriate place in the right hand frame
Whenever a class is edited or created the URI will be shown.
